

How To Delete A Strip On Wix
Tooltester is supported by readers like yourself. We may earn an affiliate commission when you buy through our links, which enables the states to offering our enquiry for complimentary.
Website builders are frequently touted as "the easiest fashion to build a website". And when we're talking website builders, they don't go any bigger than Wix – it boasts over 200 1000000 users worldwide (yous tin see some examples of real Wix websites here).
Despite this, Wix's countless editing and customization options tin can make it overwhelming for new users.
In this comprehensive Wix tutorial, we cover the main things y'all demand to know to build your own website in Wix – covering each step along the style.
While we won't get into the nitty-gritty of every unmarried affair you can do with Wix (at that place are way too many!), we promise: by the cease of this Wix tutorial, you'll know plenty to have a simple but professional-looking Wix website ready for launch.
So, allow's jump straight into it!
Who is this Wix Tutorial for?
This Wix tutorial is perfect if:
- You're a beginner, and need a stride-by-step walkthrough of how to build a Wix website
- Your website will be relatively pocket-size and elementary (east.chiliad. a personal or business organisation website that won't have a lot of content)
- You lot don't demand circuitous features (due east.g. an online store, live chat or booking service – while it's possible to set these up with Wix, they won't be covered in this tutorial)

Step-by-Step Wix Tutorial
Feel free to follow the steps in our video or read the written version instead. Or utilize both. Whatever works for you!

Try Wix for costless hither.
Footstep 1 – Sign up for Wix
The very beginning thing to do is to sign up for Wix, which you can do here. It's completely gratuitous to exercise – you won't accept to pay a affair if you're happy to have a complimentary website using a Wix domain (due east.g. yourname.wixsite.com/yoursite). If yous need 1 of Wix's paid plans, yous won't have to pay for it until later your site is ready.
Next, you'll be asked a series of simple questions about the kind of site you lot desire to build, and your level of experience.
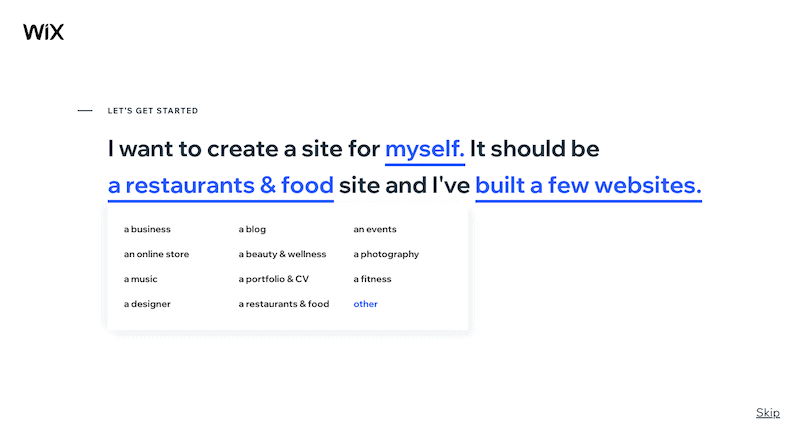
Footstep two – Choose Wix ADI or Editor
The side by side step is probably the biggest decision you'll have to brand virtually your site – should you use Wix ADI and have a site created for y'all (which you can tweak), or utilize their templates and Editor (more piece of work, but y'all have greater design command)? Wix will suggest one of these options, depending on how you responded to the questions in pace 1.

Note: you can always switch from ADI to the regular Wix editor merely not the other manner around
I'd personally recommend ADI merely if:
- Your website will be very pocket-size (one-5 pages)
- Yous demand to get a site upwards and running fast
- You don't care as well much about not having a lot of command over your design
With Wix Editor, yous'll become plenty more options for customizing your blueprint, equally well equally access to a far greater range of apps and widgets – and so this will exist your best bet if your requirements are for a slightly more advanced site.
That's why we are choosing Wix Editor to continue.
Footstep 3 – Choose your template
Here's where information technology starts to get heady! Based on the category yous've called, Wix will suggest a few templates – all you accept to do is choose the one yous want.
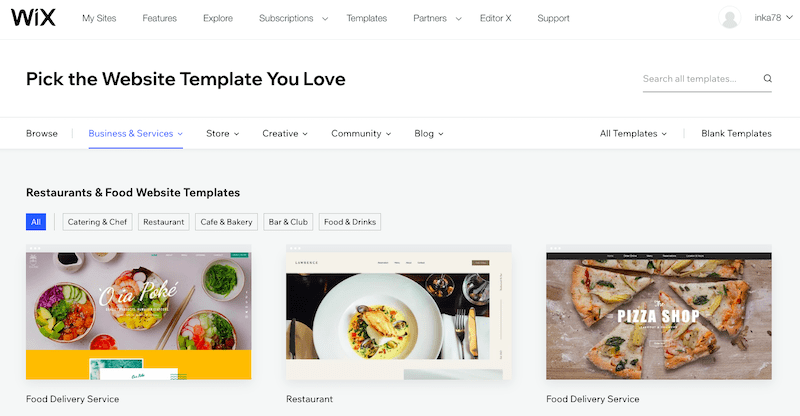
Wix has hundreds of modern-looking templates to choose from, so yous shouldn't have whatever trouble finding ane to first with. Think, the Editor will allow you make changes as you need, then don't worry too much if you can't find ane that'southward exactly what you're subsequently – it just needs to be shut.
To preview a template, hover your mouse over information technology and click 'View'. Then, select 'View full demo'.
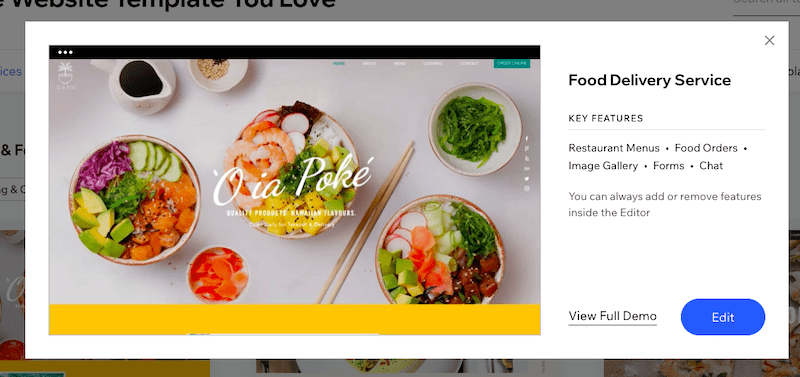
Once you've plant the right template, simply click the 'Edit' button. In our case, nosotros're going to choose the 'Nutrient Delivery Service' template under the 'Restaurants and Food' category.
Step 4 – Get to know the Editor
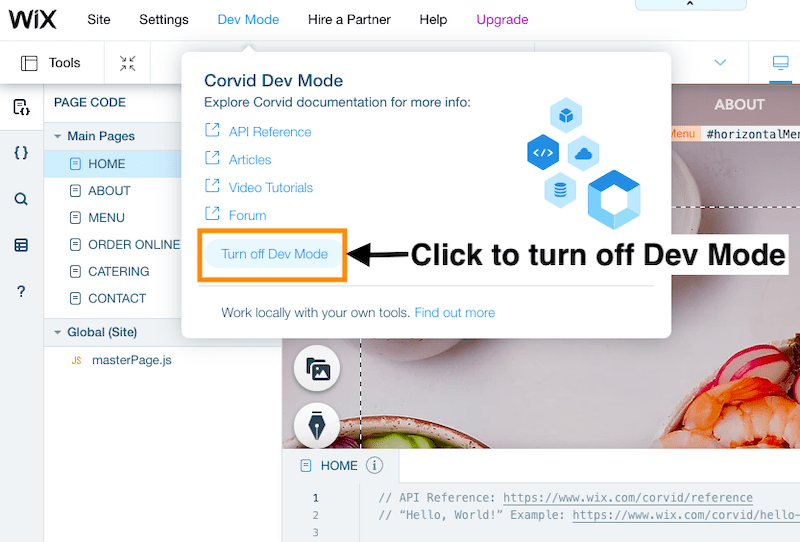
Yous'll then be taken to Wix's Editor, where you'll be making changes to your site. If you get a popup informing you almost Wix's Velo platform, you tin can click out to ignore this – this is something that just advanced users volition need.
Side by side, we want to make sure that Dev Style is turned off, so you lot don't meet any unnecessary windows (again, you'll only need these if you lot need to make changes to your code). Hover over 'Dev Style' in the elevation menu, and then click 'Turn off Dev Mode'.
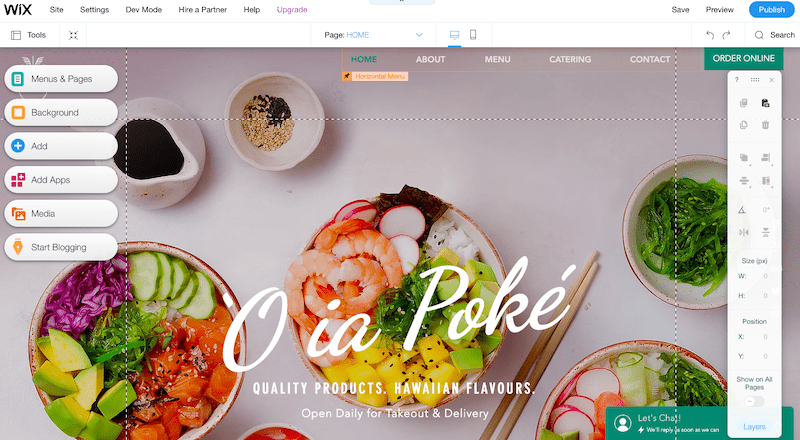
You should exist left with a view similar to this one:
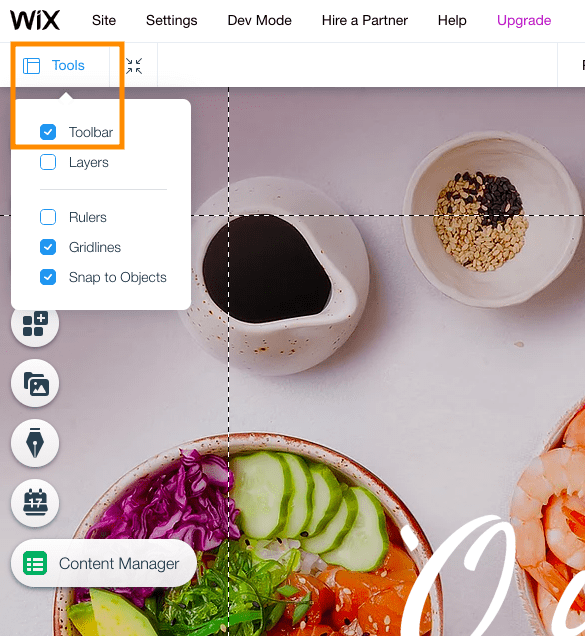
If y'all don't see the toolbar at the right of the screen, don't worry – merely click 'Tools' in the acme left, and make certain the 'Toolbar' checkbox is actually ticked:
Now, before I show yous how to kickoff making changes to your site, let me requite you a quick rundown of what it is y'all're actually seeing:
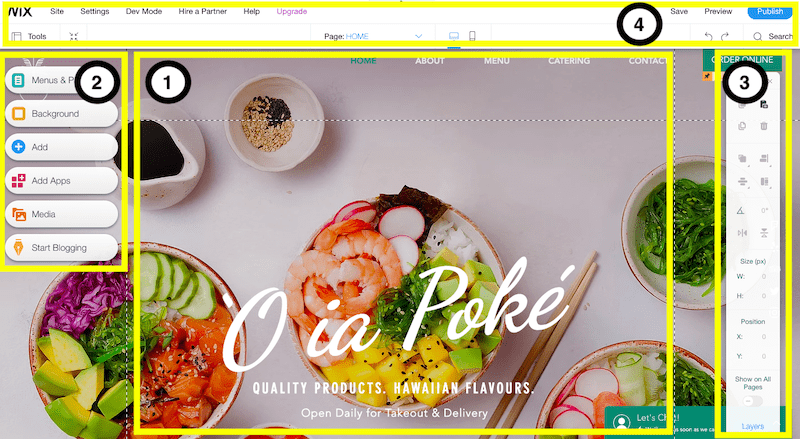
1. The page y'all're looking at is your website's homepage – pretty cool, huh? You lot'll exist making all your content changes – that is, changes to your text, images, and sections – in this role of the screen.
2. If you want to add more pages to your site, you'll do that in the left card. In fact, the left menu is responsible for helping y'all add all the extra things you'll need on your site – menus, media, forms, blogs, apps, and so on. Click on each of the buttons to get a feel for all the different options available here. We'll be taking a closer look at how to employ this section soon!
three. This toolbar on the right volition aid you tweak the appearance of your site'southward content – for example, to align or rotate images on your pages. To be perfectly honest, this is probably the section that I use the least, as you can make a lot of changes directly within the Editor (section 1).
4. The top carte gives you access to the backend functions of your website (domain name, SEO etc). It's non something you lot have to worry nearly at this stage, and then we'll embrace it in more detail a little subsequently.
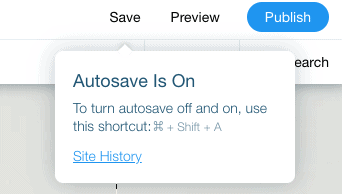
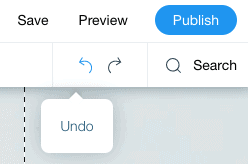
For now, the most important thing to know is that you lot tin can disengage and redo whatsoever changes in the elevation correct of this section, also as save your changes (although the Autosave function will also take care of that). Y'all can likewise access your Site History to restore previous versions of the site, by hovering over the 'Save' link.
Still with me? Great! Allow's start editing your site and then.
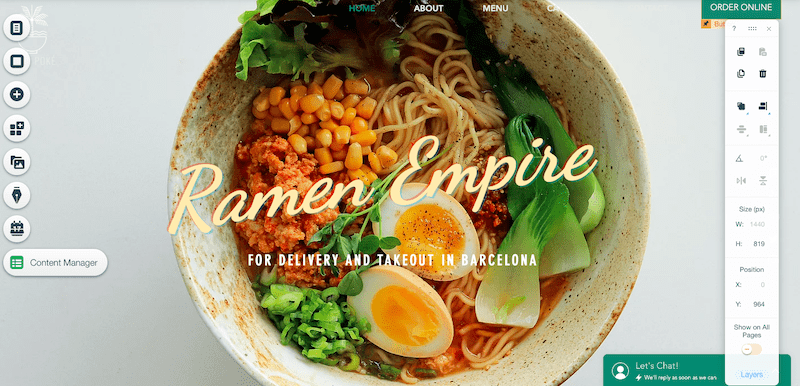
Step 5 – Edit the 'hero section' of your homepage
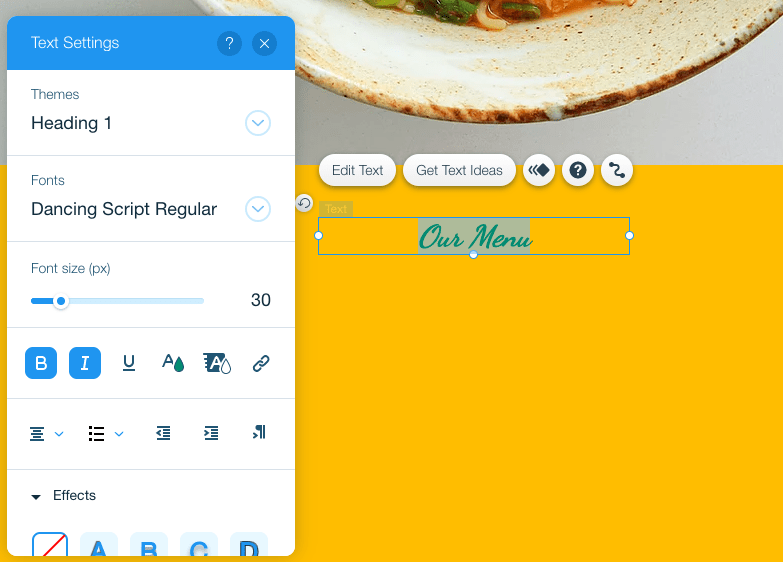
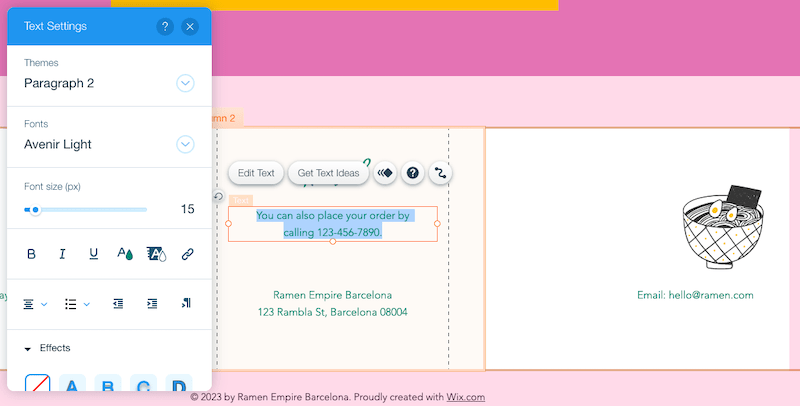
Pretty much everything you see within the Wix Editor – text, images, backgrounds etc. – is editable. All yous need to practise is double-click an chemical element, and you'll be able to edit information technology. So allow'southward start by double-clicking on the chief heading.
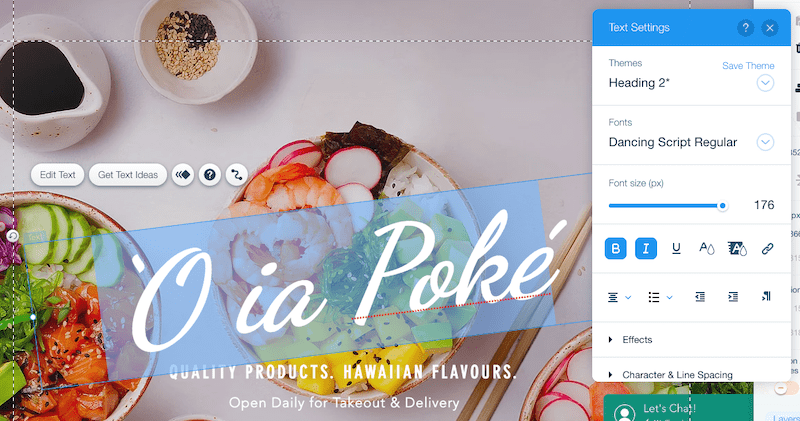
Type in whatever text y'all'd like to employ. You'll besides discover a new window called 'Text Settings' has popped upwardly – here, you can change your font, font size, color, and fifty-fifty add together effects. So go ahead, play around – and remember yous can always disengage changes by hitting the backwards pointer in the summit menu.
Tip: Avoid using more than 3-4 different font types on your website. Make certain you e'er utilize the standard formats 'Heading 1,ii,3' etc. to avert inconsistencies in your design.
You tin can also edit any text beneath the chief heading in exactly the same mode. If there are whatsoever text elements you lot desire to delete, simply click the element and hit the 'Delete' push on your keyboard (or the trash tin icon in the right toolbar).

And then far, so good! Only what if you lot want to alter the background image? Easy – just click anywhere on the background image. You'll see a push pop up with the text 'Change strip background' – click on that, and you'll get options to supplant the electric current groundwork image with a colour block, new image, or fifty-fifty a video.
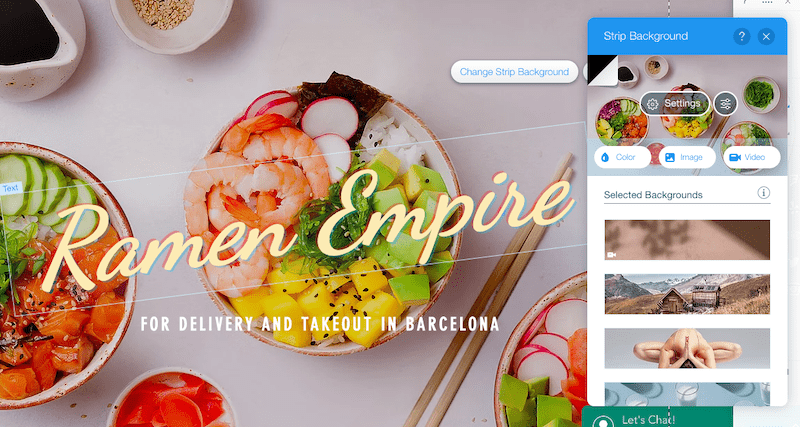
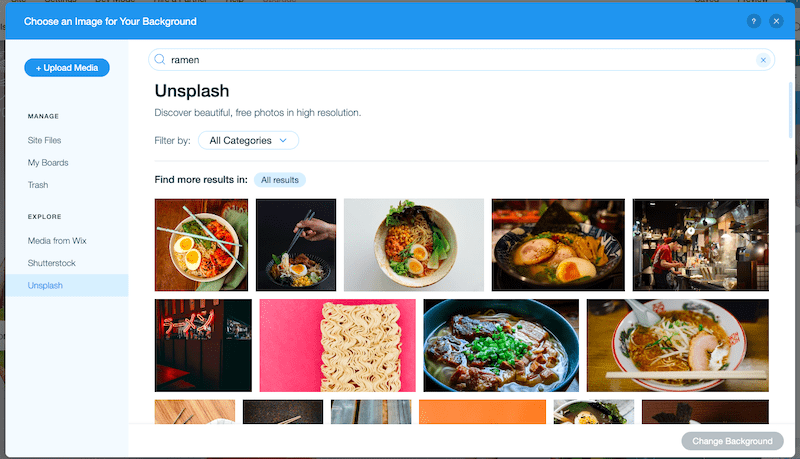
If you click 'Image', y'all can choose to either upload your own image, or select a stock prototype from Wix, Unsplash or Shutterstock (the first two are free).
After selecting our prototype, our homepage's hero section looks similar this:
Looking delicious! Let'southward scroll downward to keep making changes to your homepage.
Step 6 – Deleting, adding and editing sections on your homepage
Scrolling down, you may find that you desire to keep some of the horizontal sections in your template, only delete or change others. That's totally fine.
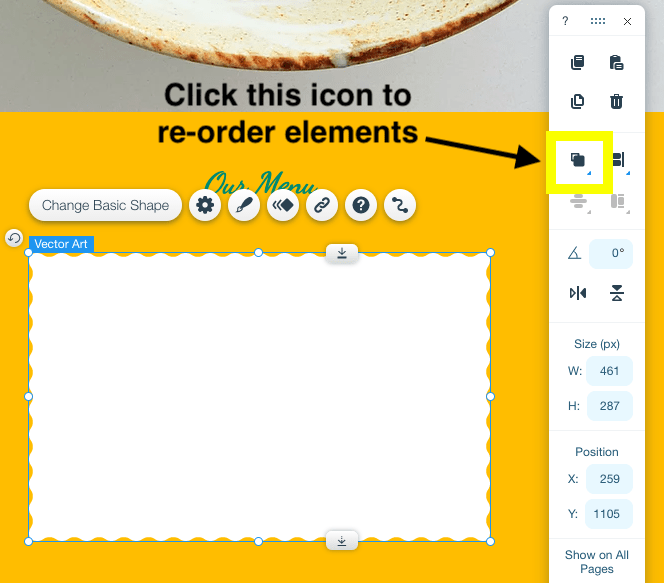
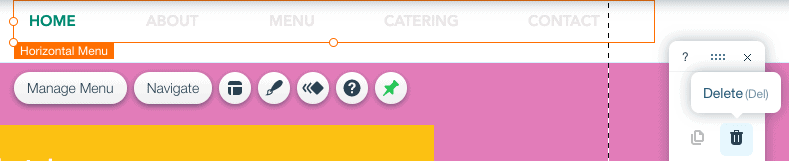
Permit's start with the piece of cake ane first – deleting sections (or 'Strips' equally Wix calls them). In the top toolbar, click the 'Zoom Out & Reorder' button:
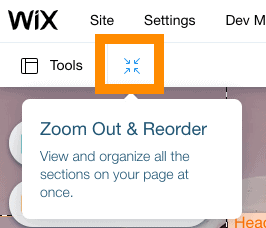
This will have you lot to a zoomed-out view of your site. Click on the strip you desire to delete. The strip will go highlighted by a blue edge. And so, simply click the trash icon to the right of the department, to delete that section.
You can besides reorder sections past clicking the arrow icons next to them, which volition move the section up or down in the folio.
How about adding in new sections? Well, that's where your left toolbar comes in handy.
First, click the light-green 'Exit mode' button in the top right of your screen, to go back to your Editor.
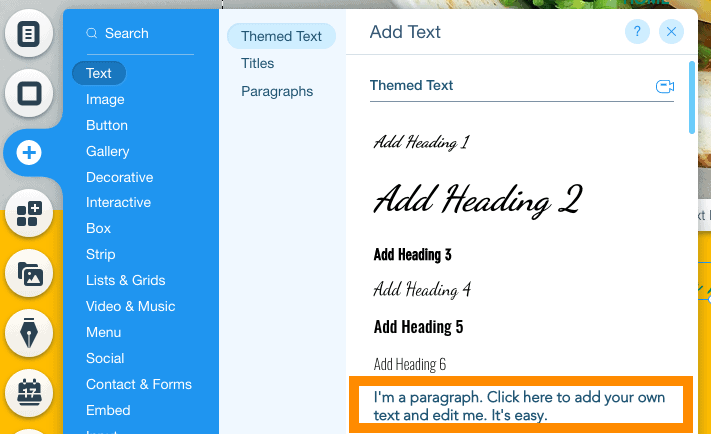
In the left toolbar, click on the push button with the + icon ('Add'). You lot'll see a huge list of options of all the dissimilar elements you tin add together to your folio – text, images, buttons, popular up lightboxes so on.
For instance, you may desire to add a new 'Strip' to supervene upon the one you've simply deleted. This strip will finer work as a container for the content (text, images etc) you lot want to add to that department. Choose from either a 'Classic' strip (a blank one), or one that already has content in it – an 'Well-nigh U.s.a.' or 'Testimonials' strip, for example. Then, merely click and drag it to wherever yous want on the page.

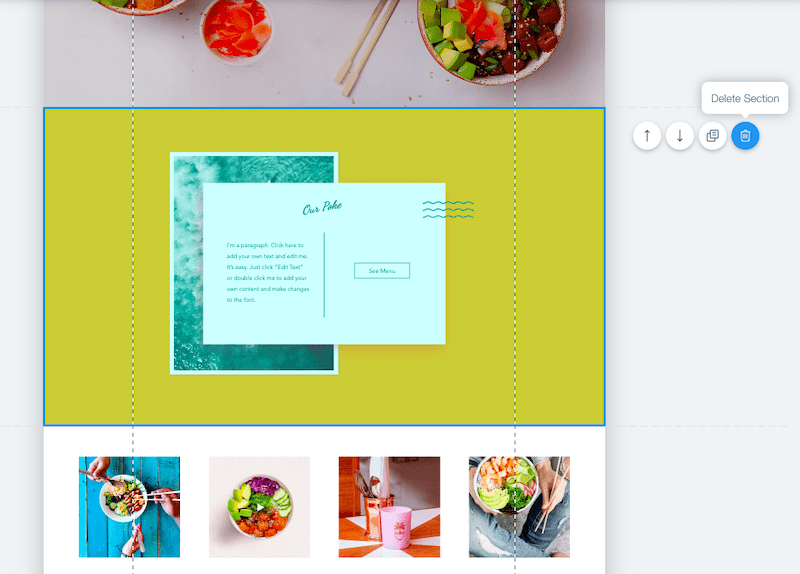
In our case, we'll be adding a 'Classic' strip, and then changing the background colour and then it fits in with the theme of our site. We'll do this the same way we changed the background in Step 5 – select the strip, click the 'Change strip background' button, and then click the 'Colour' option to change it to yellow.
Now, let's play around with adding content. My all-time suggestion would be to explore all the options available in the + icon, and have a play around with adding different elements to your new strip. Over again, y'all can always undo annihilation you don't want to keep.

For example, if you want to add a heading and text to your strip, you can do that by first adding 'Heading 1'. Drag it to where you desire it to exist positioned on the folio, and then double-click to change the text.
To add text to sit below this heading, echo the aforementioned procedure – only this time, instead of choosing 'Heading', choose one of your 'Paragraph' text options.
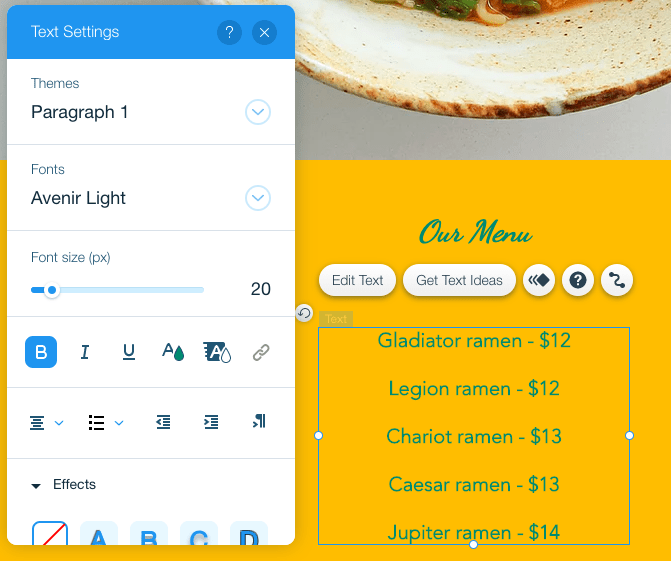
Once again, drag to reposition the text as you'd like, and double-click to change the text. Remember you tin can modify font, colors and styling yet y'all'd like, using the options in the Text Settings box.
That's not looking too bad! But what if you want to add other elements? For instance, a shape to employ as a background to the text? No problem – you tin get alee and practise that in the same fashion past clicking the + button in your left toolbar. This time, cull 'Decorative elements'.
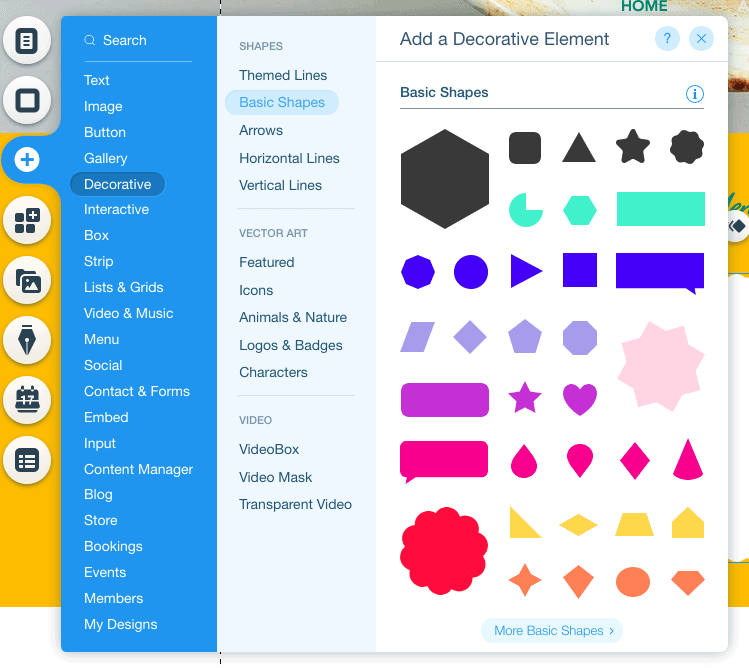
Select the shape you want, and position it where you want on the page. If it'due south covering the text (rather than sitting behind it as a background), but click the 'Accommodate' icon in your right toolbar, and select 'Send to back'.
That's looking much ameliorate at present!

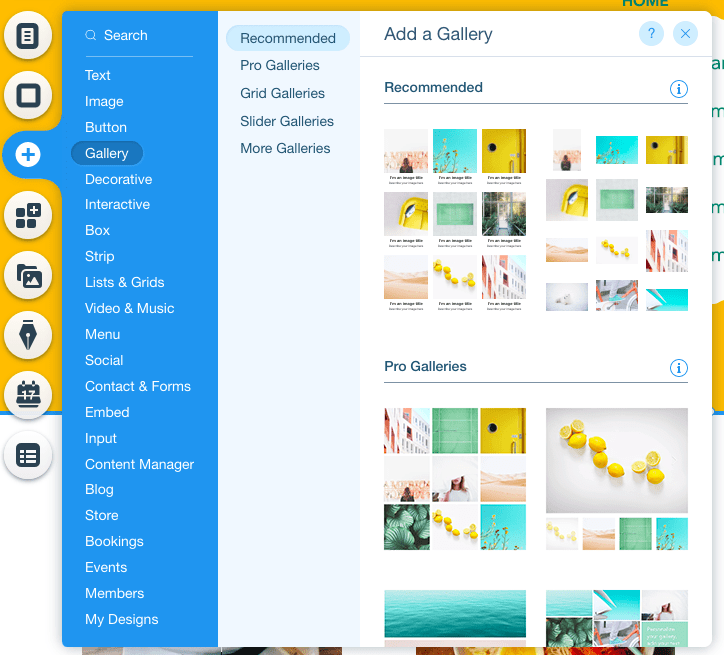
Step seven – Adding an image gallery
If you desire to include a gallery of images on your folio, that can easily be done. In one case again, using your left toolbar, click the + button and select 'Gallery'. You lot'll have a ton of gallery options to choose from:
Simply select the one yous desire, and position it every bit you'd like on the folio (if yous need to brand more space for it, remember yous can drag strips/sections further down).
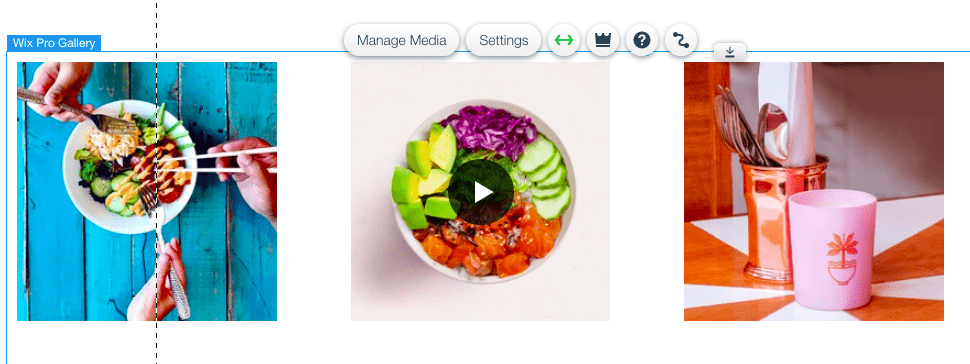
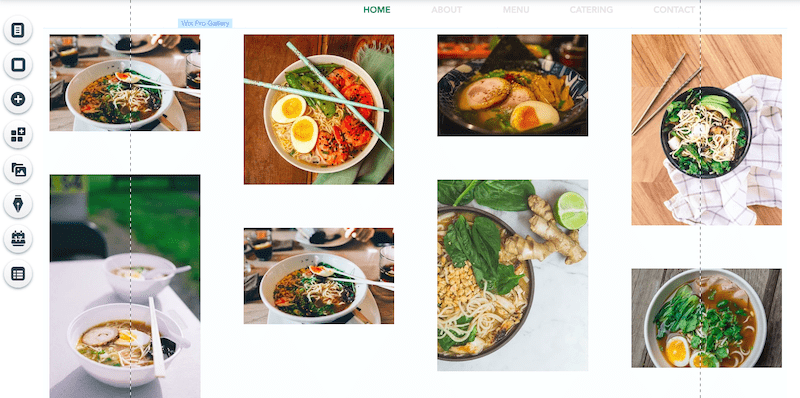
If your template already has an image gallery in it (similar ours does), all yous need to do is click on the gallery to select it. You'll encounter a few options popular up, including 'Manage media' and 'Settings':
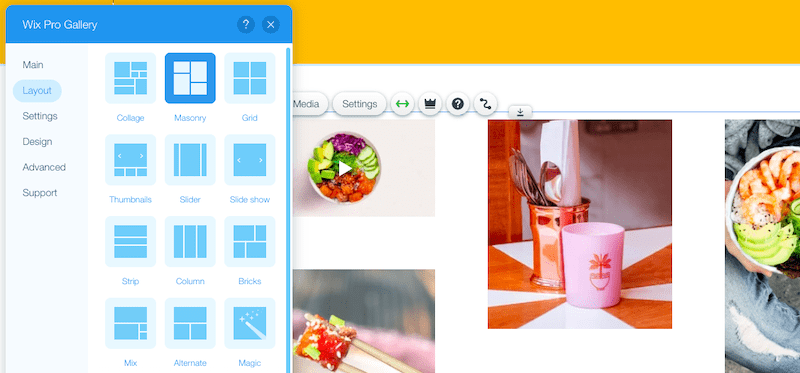
Choosing 'Settings' will allow you change the layout of how your gallery is displayed – so if y'all prefer another layout, get ahead and select it:
You can so add your ain images by selecting 'Manage media'. Delete all the current images, and click 'Add media' to upload your ain, or select some from Wix's stock photo collection.

In this same window, yous can besides edit the title and description of each of your images (these won't exist visible on your site, but are good for SEO), also as adding links (if you want).
Here's what the final production looks like:
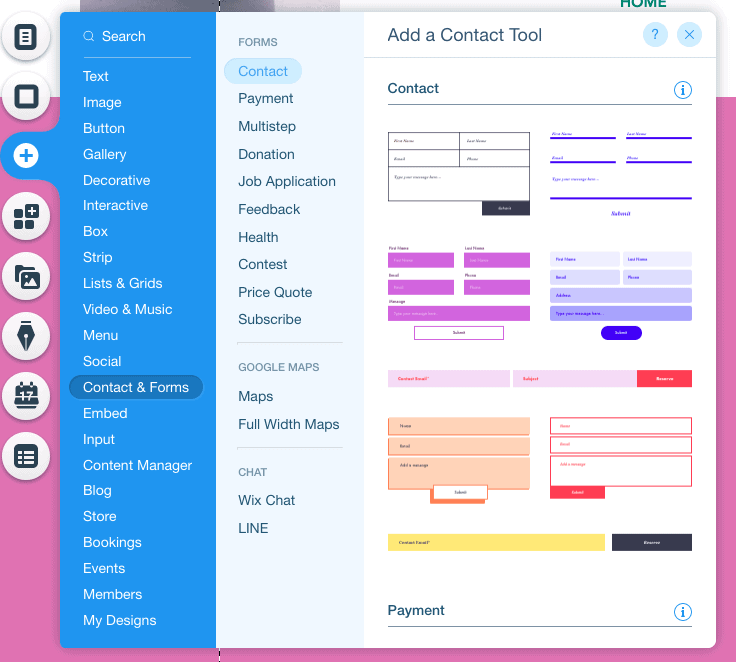
Stride 8 – Calculation a contact class
A contact form is an essential office of most websites. While y'all tin can add a contact form on a separate folio, I'm going to show you lot how to add one to your homepage.
Once more using the left toolbar, click the + push. Select 'Contact & Forms', and choose the form y'all want to include (don't worry, fields and styles can all be changed – I'll show you how in a infinitesimal).
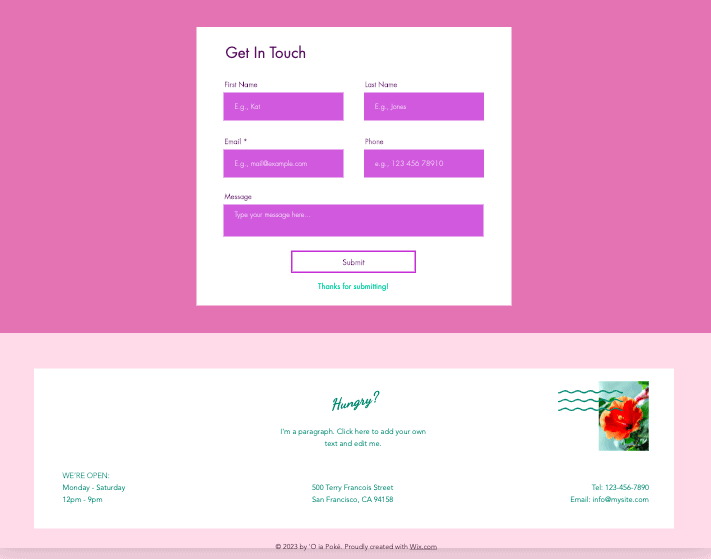
Position your form as you'd like on the page. In our case, nosotros want it at the very bottom of the page, just higher up the footer:
Allow's commencement change the fields in our form. In our case, we want to use information technology to let customers place an social club, then nosotros desire to add a few extra fields.
Click on your class, and and so on the 'Add new field' button that pops up. Then cull the type of field you lot want to add together in:
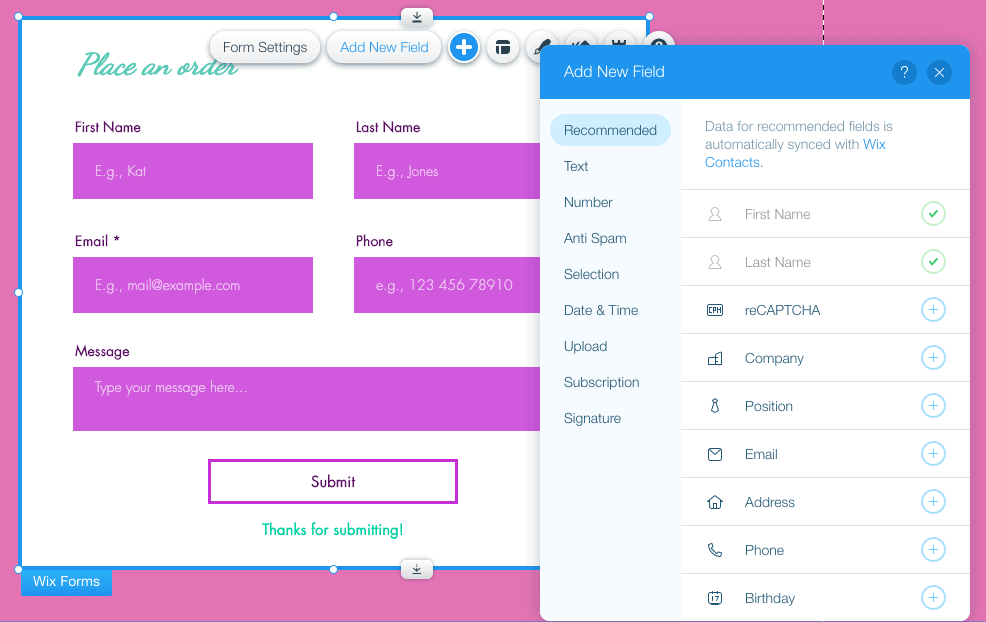
In one case your new field is added, click on that field inside the form. Click on the 'Edit field' push to edit the field title:
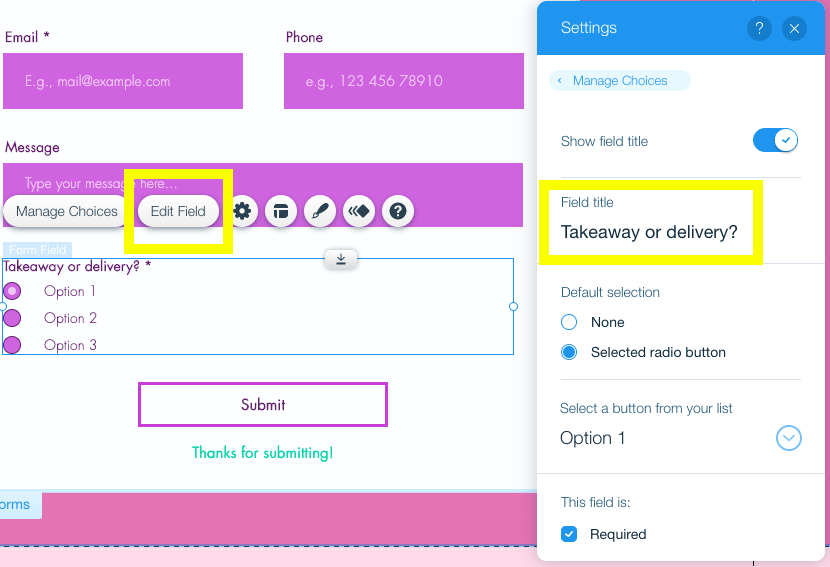
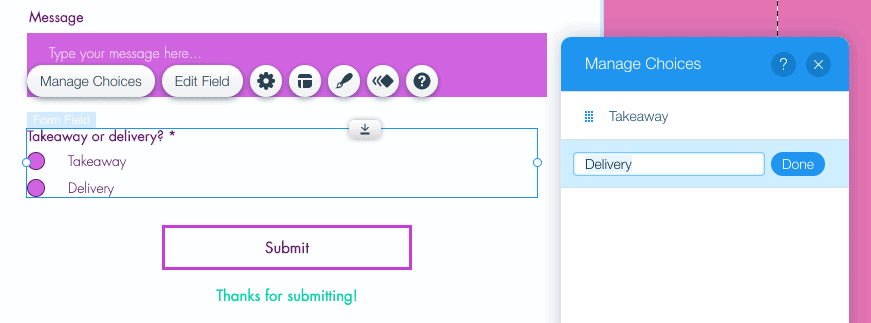
To edit the selection options, click the 'Manage choices' button:
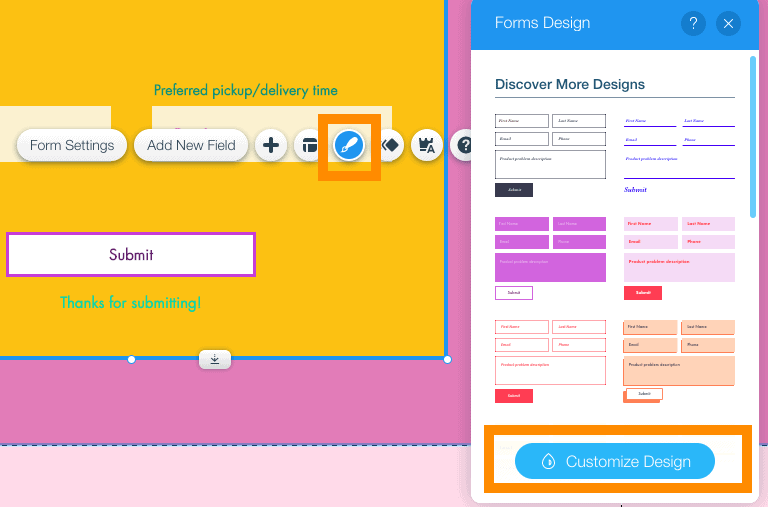
In one case you've added and edited all the fields you demand, information technology's fourth dimension to change the styling of your form to make it friction match your site. Just click the class, then hitting the paintbrush push button. Click 'Customize design' and you lot'll be able to change colors, fonts, the submit push, and so on.
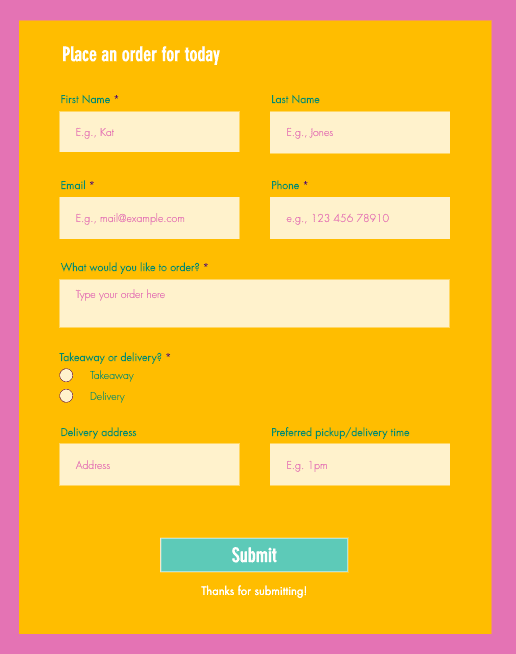
Here's what our form now looks like – pretty cool!
Tip: If yous are feeling adventurous, you lot tin fifty-fifty play effectually with HTML code on your Wix website. There are strict limits to what you tin do, but Wix does allow you to add external code snippets, for example. This can be beneficial if you e'er need a characteristic that isn't available in the Wix editor or App Market (east.g. a specific contact grade, social media feeds, a inaugural timer etc.).
Pace 9 – Tidying up your webpage
Nosotros're getting shut to being fix to publish your Wix site! And so let's tie up the last few loose ends.
In your template, you may have noticed a few extra bits and pieces that y'all didn't really want to include – a floating logo, social media icons, or a chat widget, for case.
To go rid of any of these, we'll merely delete information technology as we've deleted other elements previously – select the element, and either a) hit 'Delete' on your keyboard, or b) click the trash icon in the right toolbar.
In our instance, since we're simply building a single-page site, we desire to become rid of the floating bill of fare that appears at the top of the page – so we're going to select it and delete it.
If you desire to add together multiple pages to your site, and need help understanding how to edit your site bill of fare, check out this helpful tutorial from Wix.
Once you lot've deleted all the elements you lot don't need, we just demand to make sure your footer (the section at the bottom of the folio) is updated. Double-click this section to enter your contact details and any other relevant information you'd like to include. You tin can too add images, equally nosotros've done below:
Happy with how your page is looking? Great – we're on the home stretch so! Permit'due south move on to the next step – it's one nosotros definitely don't want to skip.
Stride x – Making your website mobile-friendly
Then far, we've been working on the desktop version of your website. Only with around 50% of traffic coming from mobile devices, it'southward essential to make sure your site is mobile-friendly.
Unfortunately, Wix's websites don't come 100% mobile-ready by default. We'll demand to make a few minor adjustments to get it there.
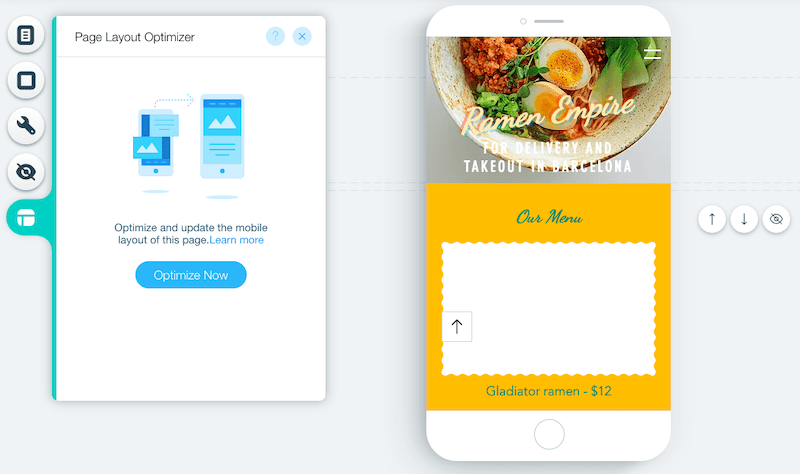
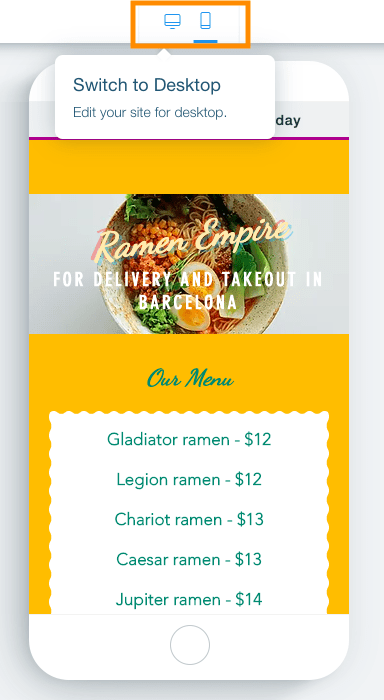
In the top carte (which we oasis't really used so far), yous'll notice a mobile icon in the middle of the screen – click on it to switch to the mobile view of your site.

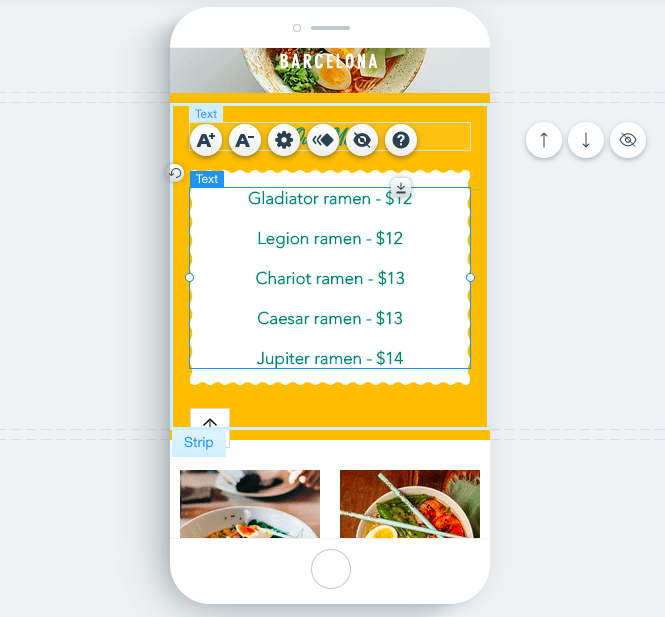
Every bit you can see, the mobile version of the site isn't quite correct all the same – some elements are misplaced. Get-go of all, let'due south click the 'Folio Layout Optimizer' push button in the left menu, so 'Optimize Now', to let Wix automatically fix some of the elements.
Now you tin get ahead and manually fix annihilation that doesn't expect right, including the placement of whatsoever text, and the height of your sections/strips. Y'all can delete or hide whatsoever unnecessary elements, and even reorder sections by clicking the pointer icons to the right of the mobile screen.
Changes that you make to the mobile version of your site will not affect your desktop site – so feel free to optimize your mobile site however you'd like.
Stride xi – Update your concern details and optimize your site for Google
This next step is completely optional, but we'd recommend it if getting institute on Google is important for your business.
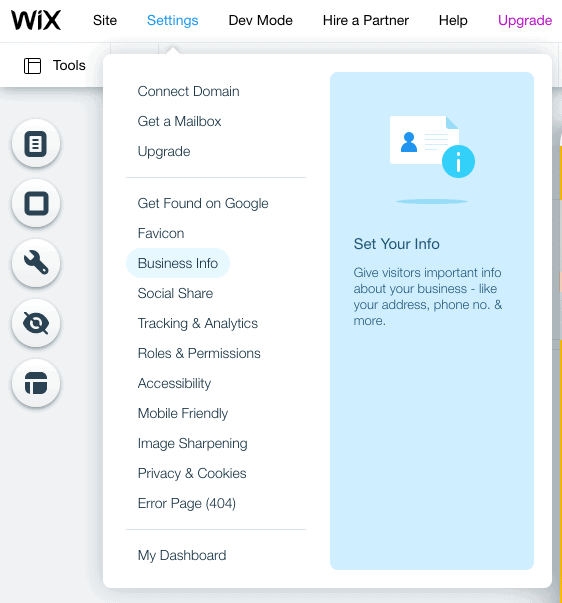
Recollect the elevation menu – the one that gives yous access to the backend (i.due east. the "unseen" part) of your site? Nosotros'll be using it to update your site'south business organization details – and get it optimized to increase your chances of being establish on Google.
Click on 'Settings', and and so cull 'Business Info'.
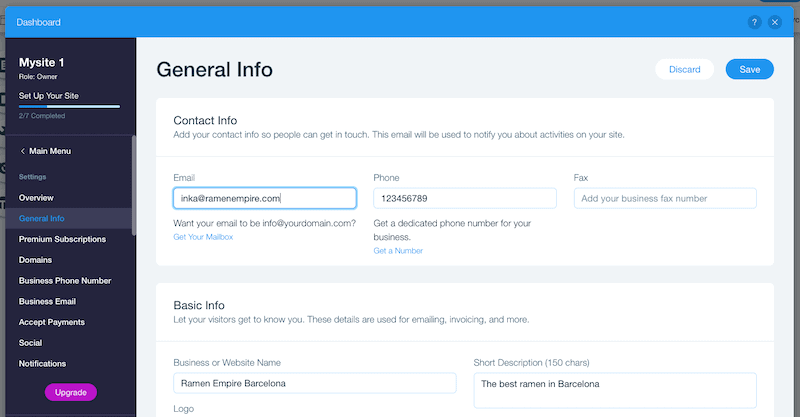
You'll then exist taken to a dashboard where yous tin can enter your contact details, business organization address if you accept one, and your site'south regional settings (language, currency etc). Don't forget to click 'Save' once you lot're done.
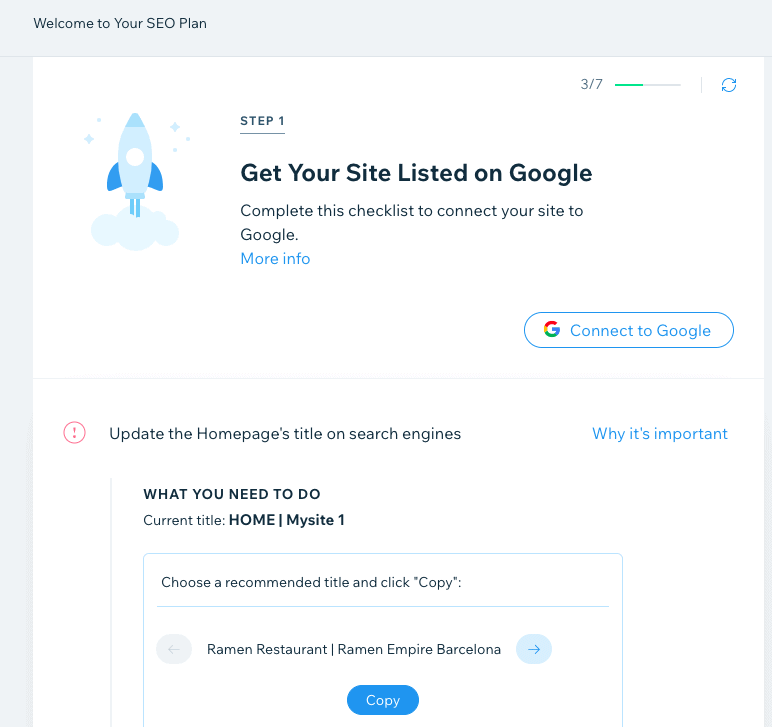
Once that'due south done, let'south take care of your search optimization settings. Once more, click 'Settings' in the top navigation bar, so choose 'Go Institute on Google'.
This volition accept yous to Wix's SEO Wizard, which will walk you lot through the steps of optimizing your site. Become through each stride, entering your business proper noun, and how y'all would describe your business.
You'll then be presented with your tailored SEO plan – we recommend going through each step to optimize the various elements of your site (homepage title, SEO description, connecting to Google etc).
If you lot're completely new to SEO, you lot tin become up to speed by checking out our beginners' guide to SEO for website builders. You tin also dive deeper into Wix'south SEO capabilities by checking out our Wix SEO guide.
Pace 12 – Preview and publish your site!
Congratulations – you've made it to the final step! Earlier you publish your site, let'southward make sure it'southward all looking ok. Hitting the 'Preview' button in the acme right of your screen, and check that you're happy with both the desktop and mobile versions of your site.
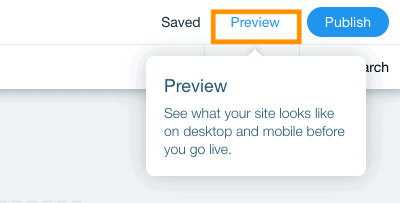
To switch from desktop to mobile view (and vice-versa), click the icons beneath:
You'll detect a banner ad at the top of your site saying 'Create your Wix website today'. This volition display if you keep your website on Wix's free program. If you want to remove it and admission more Wix features, you can upgrade to a paid plan (more on that later).
Once y'all're satisfied that everything looks okay, click the green 'Back to Editor' button at the acme right of the screen. Now, let'south get ahead and striking that blue 'Publish' button, again at the top right of the screen.

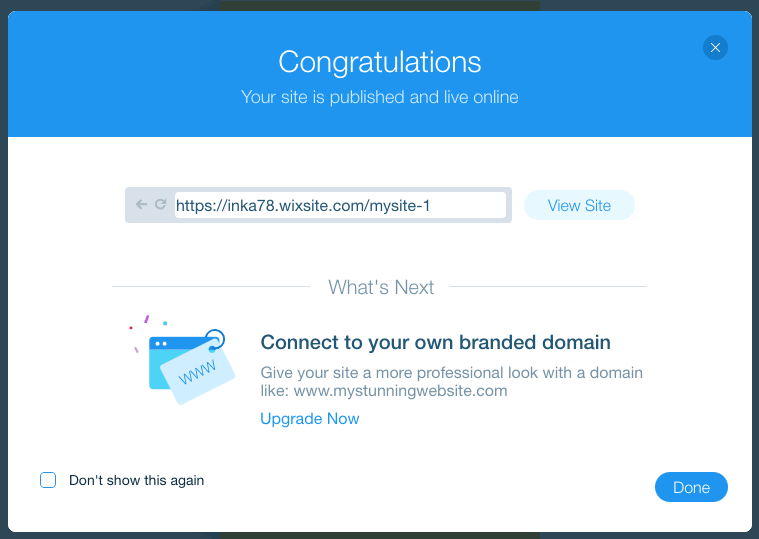
And that's it – your Wix site is at present alive! 🥳 🎉
You lot'll see a piddling popup screen, with the URL of your free Wix website – you can click 'View site' to take a look at the published page. Or, if you'd similar to employ your ain domain for your website (whether that'due south an existing domain or a new one), click 'Upgrade Now' to upgrade to one of Wix's paid plans.
For help on choosing the right Wix program for you, check out our detailed Wix pricing guide.
If you want to see the site nosotros made in this tutorial, bank check it out here.
Wix Tutorial: Conclusion
In this Wix tutorial, we've covered the basics you need to know to get a simple only fully-functional site published on Wix. But every bit one of the most powerful website builders in the market, there's plenty more you can practice with it – feel gratuitous to check out our Wix review to learn more.
If you feel like you're ready to try out Wix, you can get started here.
Not convinced that Wix is right for you lot? If you want a website builder that's fifty-fifty easier to utilise, we recommend you check out our list of the all-time website builders.
On the other hand, if you're after more flexibility and control, then you lot might desire to cheque out Wix's more than advanced features, such as Wix Editor X or Wix Velo. Annotation that these require more technical expertise, however. Webflow is also a solid alternative, although in one case once again, it has a much steeper learning curve.
While nosotros didn't encompass information technology, it'due south absolutely possible to add a blog to your Wix site – you lot can find out how hither. However, if your website'southward master purpose is blogging, we think that Squarespace or WordPress are actually better for that.
Wix has a comprehensive Assist Center with manufactures and tutorials to help you at every step of the way. In addition, you can also contact Wix Client Care by submitting a ticket, or requesting a callback.

9 December 2022 - Smaller updates and corrections
24 Nov 2021 - Checked for accuracy and smaller updates
29 Dec 2020 - Video tutorial added
THE Behind THE SCENES OF THIS Web log
This commodity has been written and researched following a precise methodology.
Our methodology
Source: https://www.tooltester.com/en/blog/wix-tutorial/
0 Response to "How To Delete A Strip On Wix"
Post a Comment